
Danish pastries are a beloved treat, and the secret to their irresistible flavor often lies in the creamy, velvety custard filling. If you’ve ever wondered how to make custard for Danish pastries, you’re in the right place. This guide will walk you through the process, from selecting the right ingredients to troubleshooting common issues. Whether you’re a beginner or a seasoned baker, this recipe will help you create the perfect custard for your Danish pastries.
Table of Contents
Introduction to Custard for Danish
What is Danish Custard?
Danish custard is a rich, creamy filling made from a combination of milk, cream, egg yolks, sugar, and a thickening agent like cornstarch. It’s smooth, slightly sweet, and pairs perfectly with flaky pastry dough. This custard is versatile and can be used in a variety of desserts, but it’s especially popular in Danish pastries.
Why Homemade Custard is Better Than Store-Bought
Store-bought custard might save time, but it often lacks the rich flavor and texture of homemade custard. By making it yourself, you can control the ingredients, adjust the sweetness, and ensure a fresh, creamy result. Plus, homemade custard is free from preservatives and artificial flavors, making it a healthier choice.
Ingredients for Perfect Custard for Danish
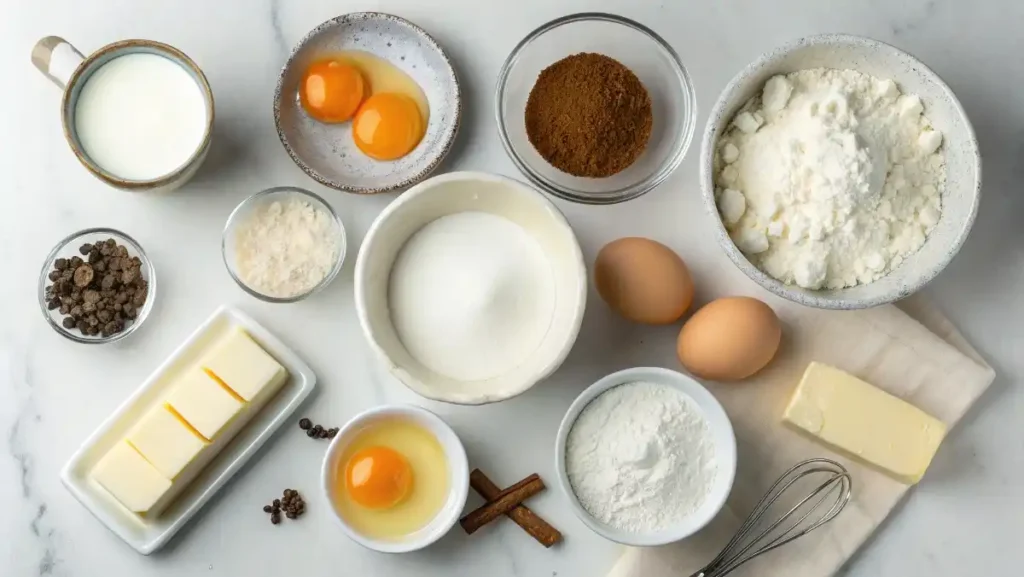
Essential Ingredients
- 2 cups whole milk: Provides richness and creaminess.
- 1/2 cup heavy cream: Adds extra richness to the custard.
- 4 large egg yolks: Acts as a thickening agent and adds a velvety texture.
- 1/2 cup granulated sugar: Sweetens the custard without overpowering it.
- 2 tbsp cornstarch: Helps thicken the custard to the perfect consistency.
- 1 tsp vanilla extract: Enhances the flavor with a warm, aromatic note.
- Pinch of salt: Balances the sweetness and enhances the overall flavor.
Optional Add-Ins for Flavor Variations
- 1/2 tsp almond extract: Adds a nutty, aromatic flavor.
- Zest of 1 lemon or orange: Provides a citrusy twist.
- 1/4 tsp ground cinnamon or nutmeg: Adds warmth and depth.
Equipment You’ll Need
Basic Kitchen Tools
- Medium saucepan
- Whisk
- Mixing bowls
- Fine-mesh strainer
- Measuring cups and spoons
- Spatula
Specialized Equipment for Perfect Custard
- Kitchen thermometer: Ensures the custard reaches the right temperature without curdling.
- Stand mixer or hand mixer: Makes whisking egg yolks and sugar easier.
Step-by-Step Guide to Making Custard for Danish
Step 1: Preparing Your Ingredients
- Measure out all your ingredients and have them ready.
- Separate the egg yolks from the whites (save the whites for another recipe).
- In a small bowl, mix the cornstarch with 2 tablespoons of milk to create a slurry. This prevents lumps in the custard.
Step 2: Heating the Milk and Cream
- In a medium saucepan, combine the milk and heavy cream.
- Heat the mixture over medium heat until it’s warm but not boiling (about 160°F or 70°C). Stir occasionally to prevent scorching.
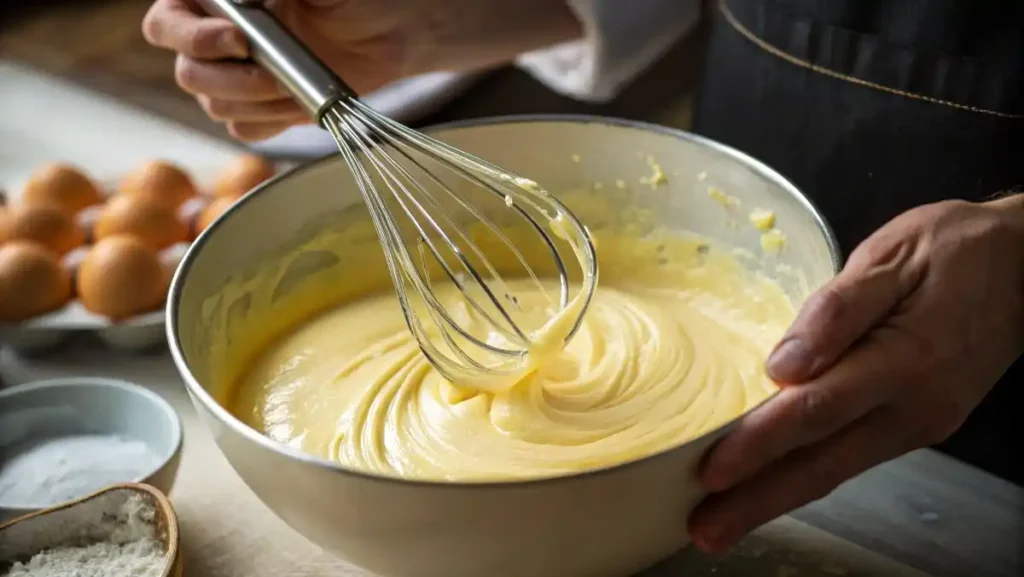
Step 3: Whisking the Egg Yolks and Sugar
- In a mixing bowl, whisk the egg yolks and sugar together until the mixture is pale and slightly thickened.
- Add the cornstarch slurry and whisk until fully incorporated.
Step 4: Combining and Cooking the Mixture
- Slowly pour the warm milk mixture into the egg yolk mixture, whisking constantly to prevent curdling.
- Return the combined mixture to the saucepan and cook over medium heat, stirring constantly with a spatula.
- Cook until the custard thickens and coats the back of a spoon (about 170°F or 77°C). This should take 5-7 minutes.
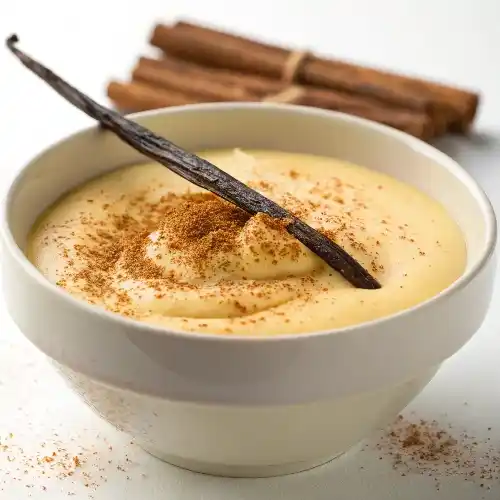
Step 5: Straining and Cooling the Custard
- Remove the custard from the heat and stir in the vanilla extract and a pinch of salt.
- Strain the custard through a fine-mesh strainer to remove any lumps or cooked egg bits.
- Transfer the custard to a bowl and cover it with plastic wrap, pressing the wrap directly onto the surface to prevent a skin from forming.
- Let the custard cool to room temperature, then refrigerate for at least 2 hours before using.
Common Problems and Solutions of Custard for Danish
Why Did My Custard Curdle?
Curdling occurs when the eggs cook too quickly. To prevent this:
- Temper the eggs by slowly adding the warm milk mixture.
- Cook the custard over medium heat, not high heat.
How to Fix Lumpy Custard
If your custard turns out lumpy:
- Strain it through a fine-mesh strainer.
- Use an immersion blender to smooth it out.
Preventing a Skin from Forming on Custard
To avoid a skin:
- Cover the custard with plastic wrap, ensuring the wrap touches the surface.
- Stir the custard occasionally as it cools.
Tips for Perfect Custard for Danish Every Time
Temperature Control Tips
- Use a kitchen thermometer to monitor the temperature.
- Avoid boiling the milk or overheating the custard.
Whisking Techniques for Smooth Custard
- Whisk constantly while combining the milk and egg mixture.
- Use a spatula to scrape the bottom and sides of the saucepan while cooking.
Storing and Reheating Custard
- Store custard in an airtight container in the fridge for up to 3 days.
- Reheat gently in a saucepan over low heat, stirring constantly.
Creative Ways to Use Custard for Danish
Filling for Danish Pastries
Pipe the custard into the center of your Danish pastries before baking for a creamy surprise.
Layering in Cakes and Desserts
Use custard as a filling for layer cakes, eclairs, or trifles.
Pairing with Fruits and Toppings
Serve custard with fresh berries, caramel sauce, or a sprinkle of powdered sugar.
Conclusion: Mastering Custard for Danish
Why This Recipe is a Game-Changer
This homemade Danish custard recipe is simple, versatile, and delivers a rich, creamy texture that store-bought versions can’t match. It’s the perfect filling for pastries, cakes, and desserts.
Encouragement to Experiment and Share
Don’t be afraid to experiment with flavors and techniques. Once you’ve mastered this recipe, share your creations with friends and family—they’ll be impressed by your baking skills!
Discover more food ideas:
FAQs About Making Danish Custard
Can I Use Whole Eggs Instead of Just Yolks?
Yes, but the custard will be less rich and creamy. Stick to egg yolks for the best texture.
How Long Does Homemade Custard Last?
Homemade custard lasts up to 3 days in the fridge. Always check for off smells or flavors before using.
Can I Make Custard Without Cornstarch?
Yes, you can use flour as a substitute, but cornstarch provides a smoother texture.
Can I Make Custard Ahead of Time?
Absolutely! Custard can be made 1-2 days in advance. Store it in the fridge and give it a good stir before using.
Can I Freeze Danish Custard?
Freezing is not recommended, as it can cause the custard to separate and become grainy when thawed. For best results, make it fresh.
Why Is My Custard Too Thin?
If your custard is too thin, it may not have been cooked long enough. Return it to the heat and cook for a few more minutes, stirring constantly, until it thickens.
Can I Use Plant-Based Milk for Vegan Custard?
Yes, you can use almond milk, oat milk, or coconut milk. However, the texture and flavor will differ slightly from traditional custard. Use a vegan thickening agent like cornstarch or agar-agar.
How Do I Know When the Custard Is Done?
The custard is done when it coats the back of a spoon and leaves a clear line when you run your finger through it. It should also reach a temperature of 170°F (77°C).
Can I Add Chocolate to the Custard?
Yes! Melt 1/2 cup of dark or milk chocolate and stir it into the custard after it’s cooked. This creates a delicious chocolate custard variation.
What Can I Do with Leftover Egg Whites?
Leftover egg whites can be used to make meringues, macarons, or added to omelets. Store them in an airtight container in the fridge for up to 2 days.
Can I Use Custard Powder Instead of Making It from Scratch?
Yes, custard powder can be used for convenience, but the flavor and texture won’t be as rich or authentic as homemade custard.
How Can I Make My Custard More Flavorful?
Experiment with flavorings like citrus zest, spices (cinnamon, nutmeg), or extracts (almond, coconut). You can also infuse the milk with vanilla beans or tea leaves for a unique twist.
Can I Use This Custard for Ice Cream?
Yes, this custard can be used as a base for homemade ice cream. Simply chill it thoroughly, then churn it in an ice cream maker.
Why Does My Custard Taste Eggy?
An eggy taste usually means the custard was overcooked or the eggs weren’t tempered properly. Be sure to cook the custard gently and avoid boiling it.
Can I Double the Recipe?
Yes, you can easily double or triple the recipe. Just use a larger saucepan to accommodate the increased volume.

How to Make Custard for Danish: Creamy and Perfect
This creamy, velvety custard is the perfect filling for Danish pastries. Made with simple ingredients like milk, cream, egg yolks, and sugar, it’s rich, smooth, and easy to prepare. Whether you’re baking for breakfast or dessert, this custard will elevate your pastries to the next level.
- Total Time: 30 minutes
- Yield: About 2 cups (enough for 8–10 Danish pastries) 1x
Ingredients
-
2 cups whole milk
-
1/2 cup heavy cream
-
4 large egg yolks
-
1/2 cup granulated sugar
-
2 tbsp cornstarch
-
1 tsp vanilla extract
-
Pinch of salt
Instructions
-
Prepare the Ingredients: In a small bowl, mix the cornstarch with 2 tablespoons of milk to create a slurry. Set aside.
-
Heat the Milk and Cream: In a medium saucepan, combine the milk and heavy cream. Heat over medium heat until warm (about 160°F or 70°C). Do not boil.
-
Whisk Egg Yolks and Sugar: In a separate bowl, whisk the egg yolks and sugar until pale and slightly thickened. Add the cornstarch slurry and whisk until smooth.
-
Combine and Cook: Slowly pour the warm milk mixture into the egg yolk mixture, whisking constantly. Return the mixture to the saucepan and cook over medium heat, stirring constantly, until it thickens and coats the back of a spoon (about 170°F or 77°C).
-
Finish and Cool: Remove from heat and stir in the vanilla extract and salt. Strain the custard through a fine-mesh strainer into a bowl. Cover with plastic wrap, pressing it directly onto the surface to prevent a skin from forming. Cool to room temperature, then refrigerate for at least 2 hours before using.
Notes
-
Storage: Store custard in an airtight container in the fridge for up to 3 days.
-
Reheating: Gently reheat on the stovetop over low heat, stirring constantly.
-
Flavor Variations: Add 1/2 tsp almond extract, citrus zest, or a pinch of cinnamon for a unique twist.
- Prep Time: 10 minutes
- Cook Time: 20 minutes (plus 2 hours chilling)
- Category: Dessert, Breakfast
- Method: Stovetop
- Cuisine: Vegetarian
Nutrition
- Serving Size: 2 tbsp
- Calories: 70 kcal
- Sugar: 6g
- Sodium: 15g
- Fat: 4g
- Saturated Fat: 2g
- Unsaturated Fat: 1.5g
- Trans Fat: 0g
- Carbohydrates: 7g
- Fiber: 0g
- Protein: 2g
- Cholesterol: 50mg
See more recipes options:
-
5 Reasons Why Blueberry Bagels Are the Ultimate BTreat
Spread the loveThis Blueberry Bagels Recipe is a delightful twist on a classic favorite. Imagine biting into a soft, chewy bagels bursting with the sweet-tart flavor of fresh blueberries and … Learn More
-

Apple and Pecan Danish Pastry Tart – The best Bakery-Style Treat!
Spread the loveThe Ultimate Recipe for Apple and Pecan Danish Pastry Tart Few desserts capture the magic of homemade baking like an apple and pecan Danish pastry tart. Imagine biting … Learn More
-

Arabic Breakfast food Recipes: Delicious Ideas
Spread the loveExplore delicious Arabic breakfast food recipes, from classic dishes to modern twists. Perfect for bringing rich Middle Eastern flavors to your table. Why Arabic Breakfast Stands Out The … Learn More